How to Make Background Transparent in Photoshop
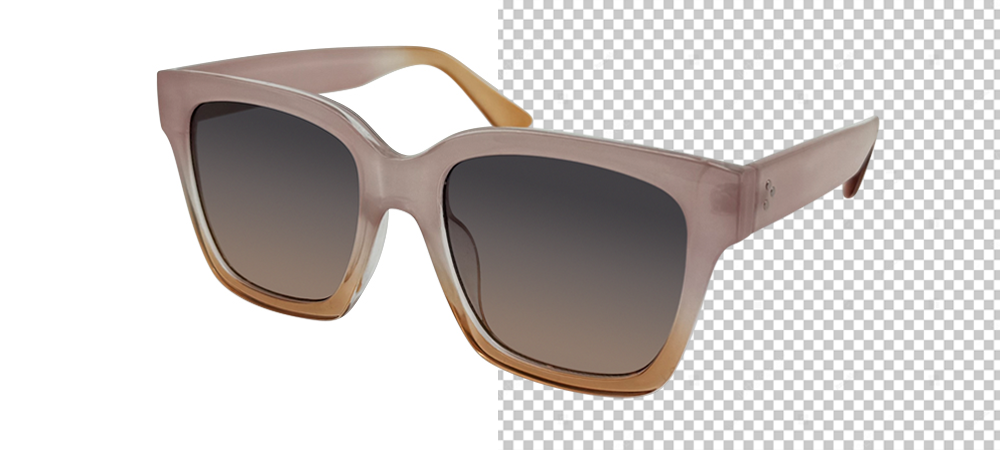

Open your specific product image in any version of Photoshop. It can be in any format but most likely, it’ll be in a JPG format, if your format is different don’t worry all procedures will same. We’ll use a sunglass image, for this example, taken against a white background that not looks like a professional product image. To give a professional look just follow these next steps.
Contents

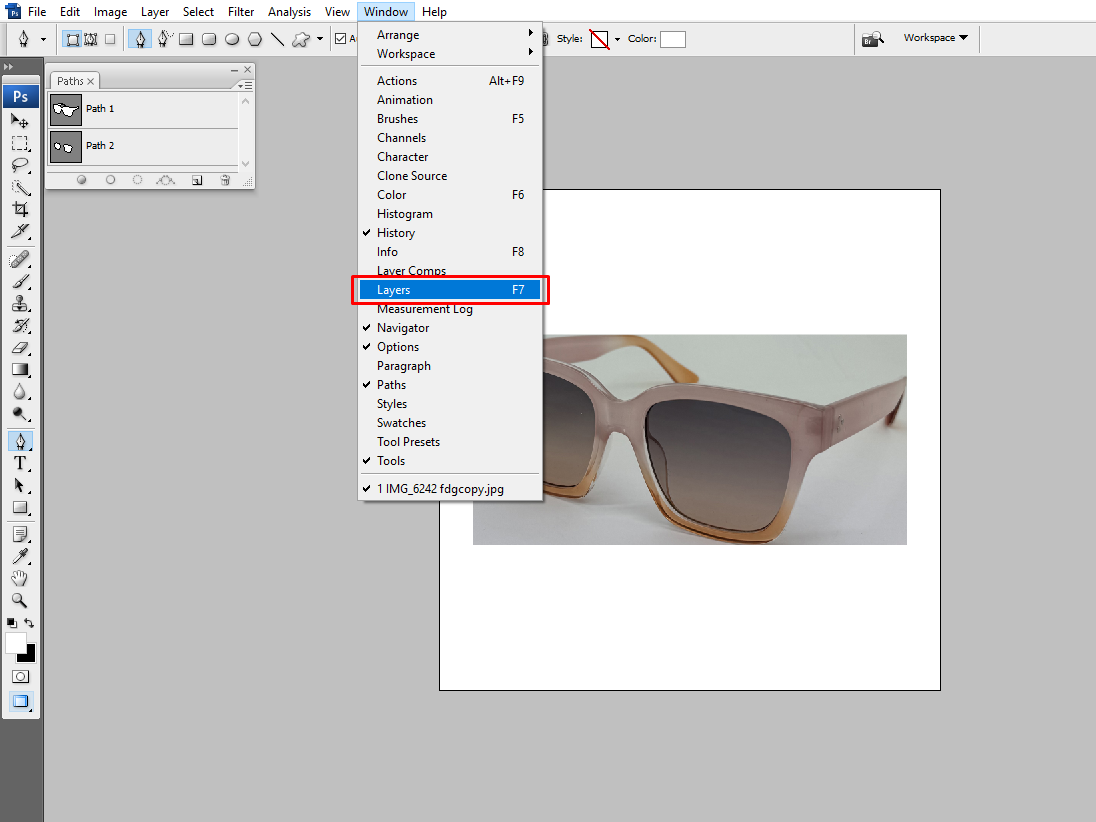
Open your Layers panel. By default, this Layers panel stands to the right side of your image window, but if you don’t see the layers panel you can access it by clicking on the Window button that is on the dropdown menu at top of photoshop and then click on the Layers.

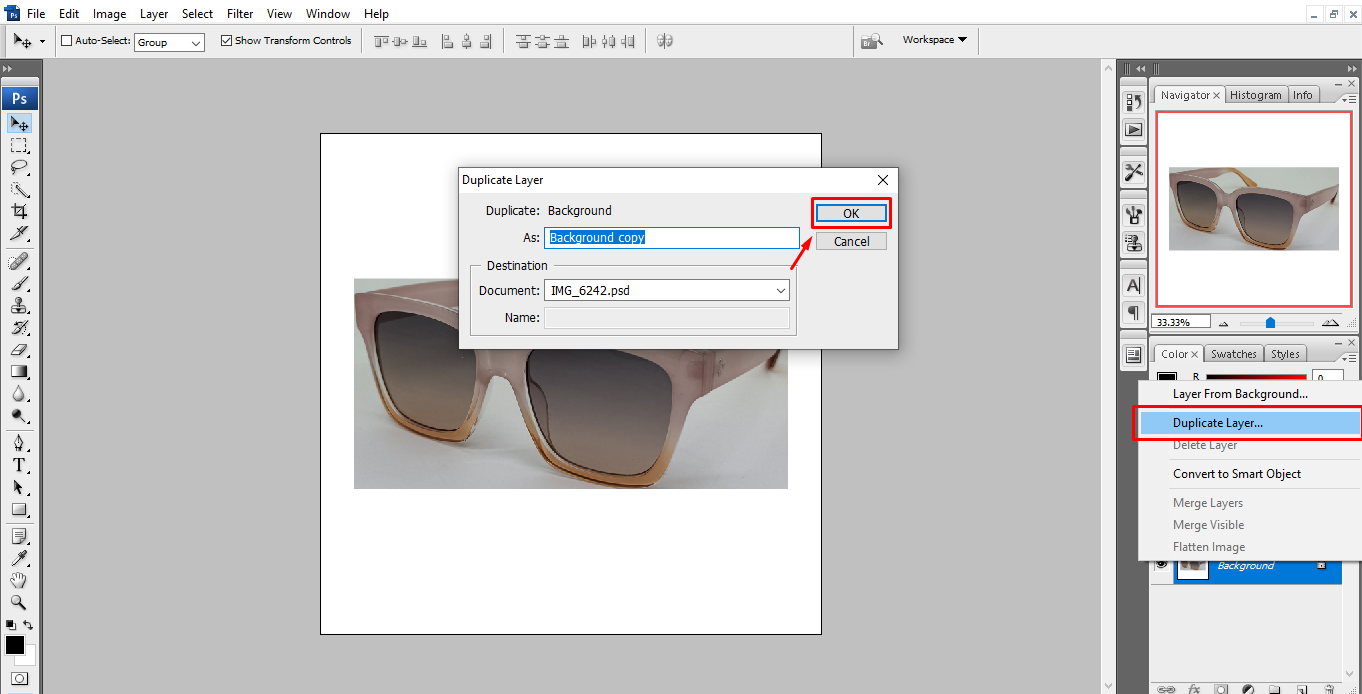
After opening the Layers panel, Right-click on the Background layer and select the duplicate layer option. A New Layer popup box asks to duplicate the layer as Background Copy and click OK to duplicate the layers.
To start creating your selection first select the Magic Wand tool from the Toolbar on the left side of the Photoshop window.
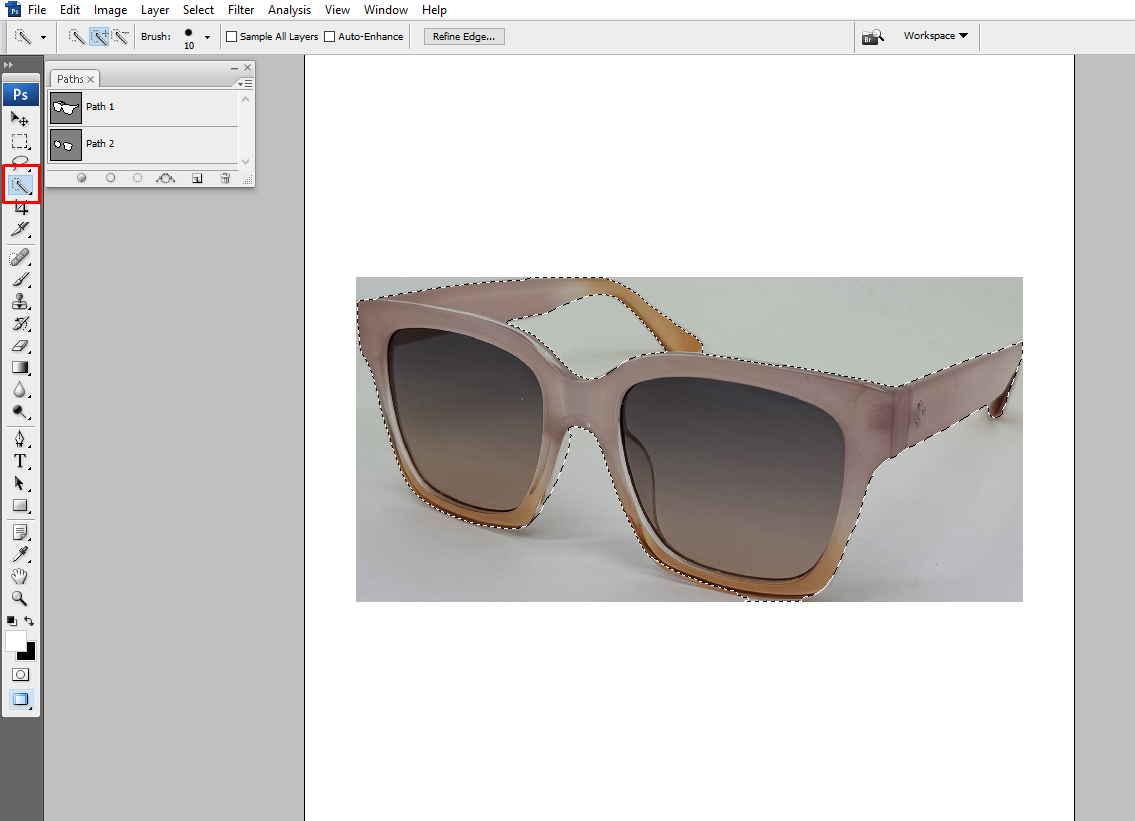
Now can simply draw a clean line around the subject or area you want to select, and the Magic Wand tool will do the rest. You can also use the Magic Wand tool to select areas based on color, brightness, or contrast. You can also use the Magic Wand tool to select text or areas of a photo that have similar colors or brightness.
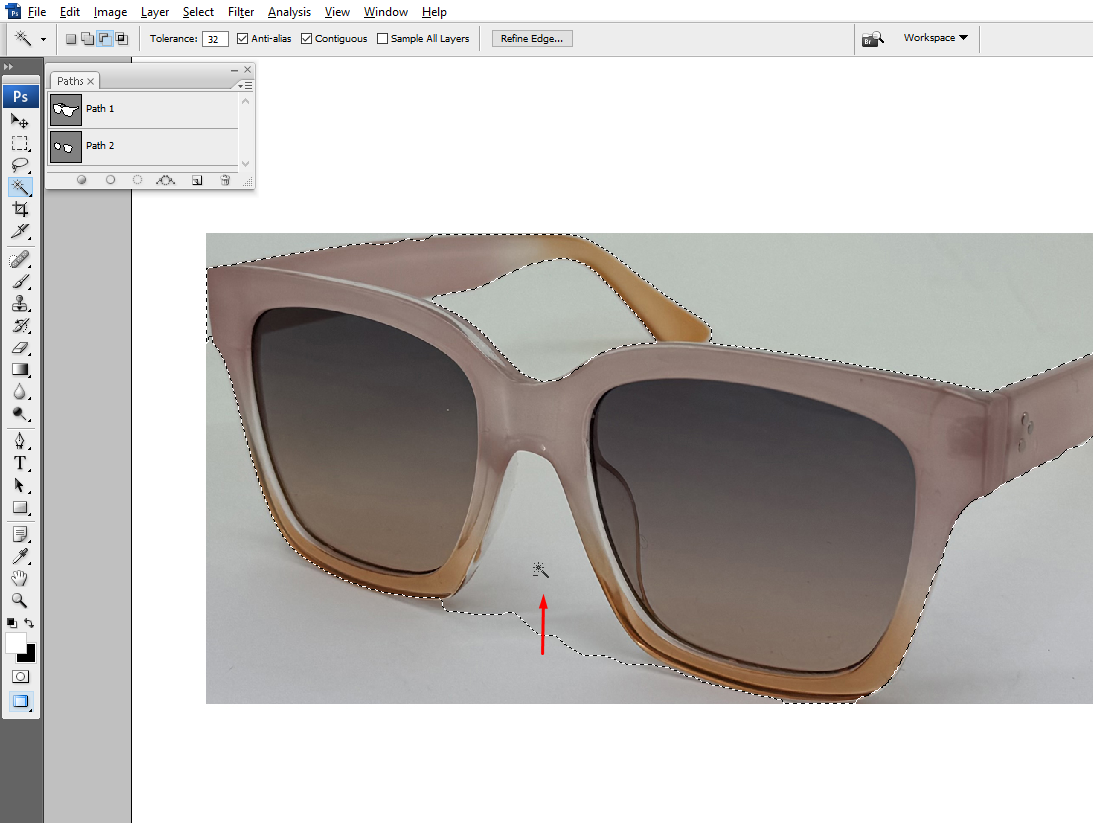
If your selection is not perfect, you can remove the extra background that you dont want, or add more of the product to the selection, using the Magic Wand tool, depending on the selection.
In our example, Photoshop didn’t completely remove the sunglass shadow from the ai selection, so we’ll now use the Subtract from the selection icon at the top of the Options bar, and then click on portions of the shadow with the Magic Wand tool until the selection is selected only the sunglass. After selection, Press Ctrl + Shift +I to invert the selection from image to image background.
Clipping paths are a great way to make backgrounds transparent. To create a clipping path, you need an image with a lot of empty space around the object or person you want to keep in the picture. To start creating a selection using the Pen Tool, first, open the tool from the menu option on the left side.
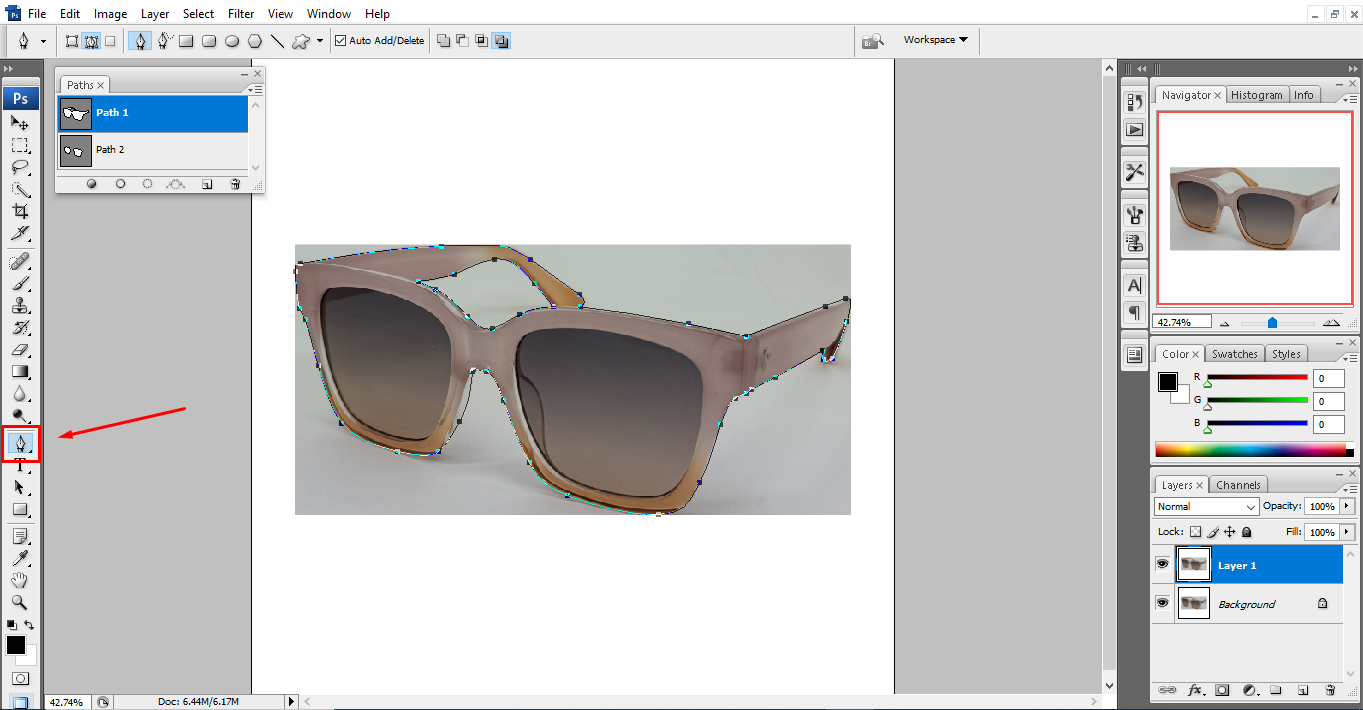
Then, select the Pen Tool and draw a shape around them (keeping in mind that when it’s done, this is going to be the shape that overlays your background). Once you’ve drawn your shape, right-click on it and select Make Selection. This will turn your selection into a vector path that can be used as an alpha channel. You’ll have to save this as a separate file so that it can be applied to your other image later on. Use Save Selection As… at the bottom of the Layers Panel to do this. When you’re ready to apply your new layer, go back up to the top of the Layers Panel and choose Select All. The inverse should already be selected for you by default but if not, check it off yourself.
When you have done selecting your product selection with Magic Wand or Clipping Path, next select the inverse by typing (SHIFT+COMMAND+I on a Mac) and (SHIFT+CTRL+I for Windows) on your keyboard.
If you don’t want to do this or if your keyboard has some problem don’t worry you can do it by using Select > Inverse from the dropdown menu you can find the top of the Photoshop application window.
Click on the inverse option that you find and it will select the background automatically, To Remove the Background simply press (BACKSPACE on Windows) and (DELETE on Mac). Now your product image background will be transparent. In Photoshop, a transparent background looks like a gray and white checkerboard pattern.
Now Type (CTRL+D on Windows) and (COMMAND+D on Mac) to deselect your selection.
Removing the background and creating a transparent background is the first step in this lesson; you should make sure that you are saving that image in the correct format to display a transparent background and size to publish on any eCommerce website or any online platform.
If you are uploading on any eCommerce website like Amazon, Alibaba, or Ali-express, your personal website, and also you want to display with a transparent background then you should choose PNG-24 format. This is the best format for you. Only this PNG format allows for multiple layers of transparency, that’s meaning your image will never have pixelated when placed on a different color background. Always use the newest PNG format such as PNG-24 older transparent file formats can create an undesirable halo effect, so always try to use a PNG-24.
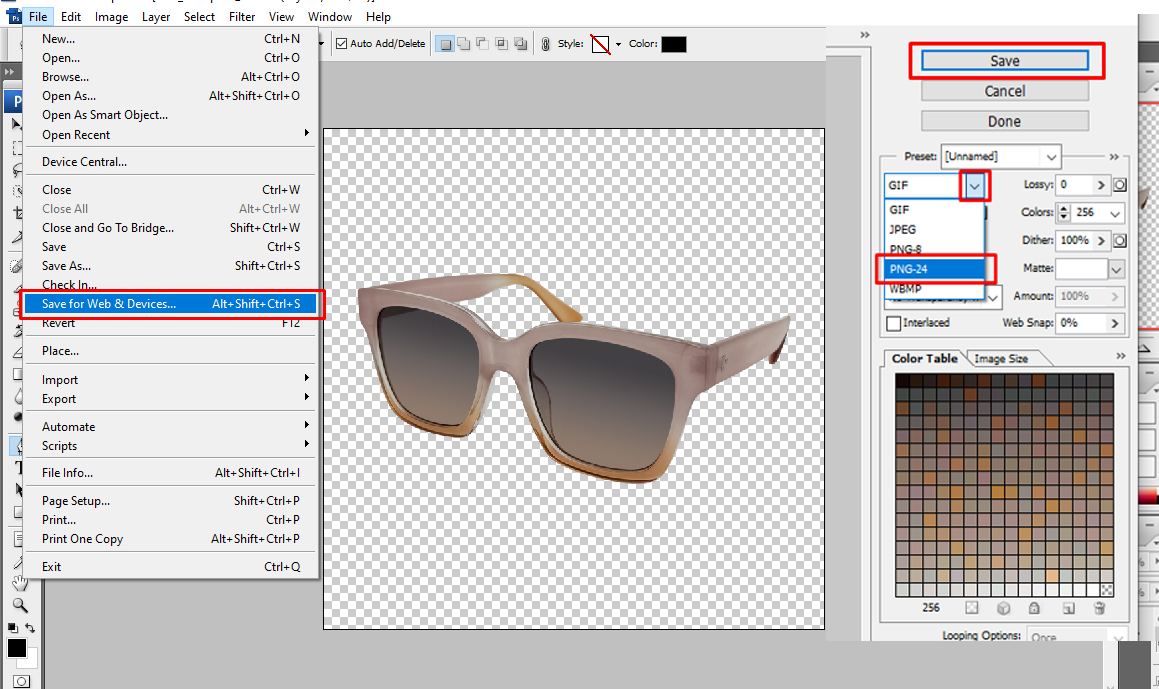
To save your edited file in PNG-24 format in Photoshop CC, Just type on your keyboard (SHIFT+ALT+CTRL+W in Windows) and (SHIFT+OPTION+COMMAND+W on Mac) or you can choose File > Export > Export As… from the dropdown menu at the top of the Photoshop CC application window.
Attention: If you’re using an older version of Photoshop, and you don’t see any Export As… option, don’t worry you can choose to Save for Web option and select PNG-24 from the Preset dropdown menu that is on the right side of the dialog box.
In the dialog box that appears, under File Settings on the right-hand side of the box, set the Format in PNG, and make sure not to check Smaller File (8-bit) this converts your file to PNG-8 format which is not recommended. Check the Transparency box.
On the left side of the image, you will see the file size for your PNG file and this is very important to keep an eye on because larger file sizes image will make your web page load more slowly so your conversion rate will drop causes of your new product visitor will don’t wait for a long time. My personal preference experience and after a long experiment I can say to keep web images at 200 KB or smaller than 200 KB.
To adjust your image size perfectly you need to adjust the dimensions of your image. Big dimensions mean a big file size so try to use a smaller dimension that’s why file size will be smaller. Find the dimensions option on the right side of the dialog box, under image size.
Note: dont try to use the dimensions too smaller so your image will look blurry and unprofessional.
Additionally, since many of your customers will be viewing your product on a retina display, it is recommended that you save your product’s image 50 to 100 percent more extensive than the size you anticipate it will display. As a result, it will appear crisper on all devices. To put it another way, if you know that your product’s maximum width will be 400 pixels, you should make it at least 600 pixels wide here.
Therefore, it is true that you will need to strike a delicate balance in order to reduce the file size while simultaneously increasing the size of your image. You can choose to have only your featured product images saved larger for retina displays and to allow the majority of your product images to be saved at their actual size to reduce load time.
Click Export All after you have set your Image Size to the right dimensions.
Select the folder where you keep your ready-for-web product images in the Save dialog box. To avoid confusion when loading your images onto your website, it’s a good idea to keep your optimized image files separate from your original image files. Give the image file a name and make sure to set the extension .png.
Click “Save.”
Now you can perfectly display your transparent product image on your website against a variety of backgrounds.

The background of your website’s logo should always be transparent. This way, you can display it wherever you want on your website, regardless of the color of the page’s background.
However, just like we did for the product image in the previous example, if your logo was saved as a JPG, you will need to remove background in Photoshop and resave the file as a PNG-24. If you are fortunate enough to possess a logo in the form of a vector file with the extension.AI,.EPS, or.PDF, you will still need to open the file in Photoshop and convert it to a PNG-24 format for it to be suitable for use on the internet.
In Photoshop, go to File >Open the file and move around until you find your logo. Select “Open.”
If you’re opening a .JPG (or another raster format) file, just open the file in Photoshop.
However, if you are opening a file in vector format, you will need to check your settings in the following dialog box:
Then click ok
You can skip this step if you’re working with a vector file. However, if you are working with a JPG, you will need to select the background and remove it from the image.
You will need to double-click the Background layer in the Layers panel and select OK to convert the Background to Layer 0, just as we did in Step 1 when we made the background of a product image transparent above.
Because the background of your logo is likely entirely white, selecting the background of a logo file differs slightly from selecting the background of a product image. Click on the white background of your logo file with the Magic Wand tool from the Toolbar. To add additional areas to your selection, hold down the SHIFT key while using the Magic Wand tool.
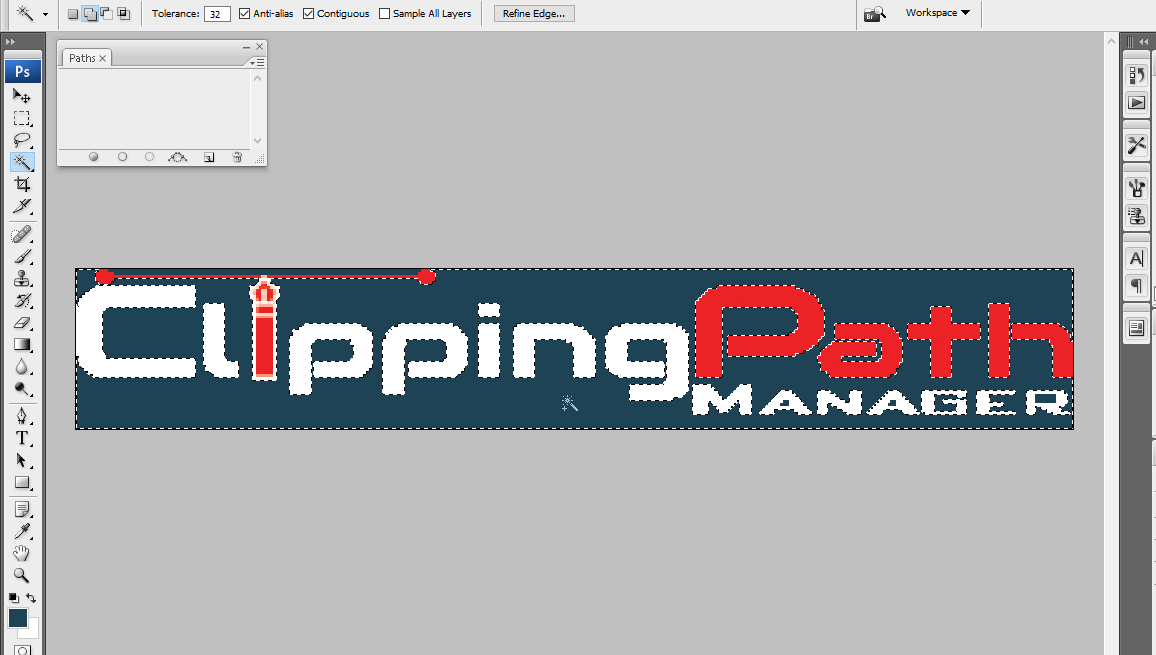
Type BACKSPACE (DELETE on a Mac) once you have selected the entire background. Now you’ll see a checkerboard pattern of gray and white on a transparent background.

To export your file as a PNG-24, follow Steps 4 and 5, where we made a product image transparent above. No matter what file format you started with, these steps are the same whether it was a JPG, AI, PDF, or another file format.
You will notice that your image has a significantly smaller file size when exported compared to your transparent background product image. This is due to the fact that product images contain thousands of colors, whereas logos typically only have one or two colors. So when you save your logo file, you don’t have to change the image’s proportions. Maintain the same dimensions as the original file you’ve been working with, and click Save.
Now you know how to make transparent web-optimized images with backgrounds that look great and don’t slow down your website.

Do you need a photo edited but don’t have the time or skills to do it yourself? Look no further than our team of professional photo editors. We can take care of everything from basic fixes to more complex edits, like color correction and restoration, clipping path, photo retouching, image masking, product photo editing, and ghost mannequin, Plus, our prices are very reasonable, so you can afford to have your photos looked after without breaking the bank.
The best Photo Editing Service Provider company is Clipping Path Manager And Fix the Pix
Contact us today to get started!